
CentOS7 静默安装 Oracle 11g
在 Linux 上通过命令行静默安装 Oracle 11g 数据库
环境
命令行前缀说明:
#表示使用 root 账号执行命令$表示使用非 root 账号(例如:oracle)执行命令SQL>表示在 SQLPlus 中执行的 SQL 命令
测试虚拟机
CPU:4核
内存:8G
操作系统
shell 1
2cat /etc/redhat-release
CentOS Linux release 7.5.1804 (Core)
下载 Oracle 11g:Oracle官方网站
选择与你系统和架构相同的版本
下载完成后,有两个压缩文件
1 | ll |
安装依赖包
修改 yum 源
修改 yum 源为阿里云源,加速下载包文件
CentOS7 替换阿里云源
1 | mv /etc/yum.repos.d/CentOS-Base.repo /etc/yum.repos.d/CentOS-Base.repo.backup |
安装依赖包
安装
shell 1
2
3yum -y install binutils compat-libstdc++-33 elfutils-libelf elfutils-libelf-devel \
expat gcc gcc-c++ glibc glibc-common glibc-devel glibc-headers libaio libaio-devel \
libgcc libstdc++ libstdc++-devel make pdksh sysstat unixODBC unixODBC-devel检查依赖是否安装完整
shell 1
2
3
4
5
6rpm -q binutils compat-libstdc++-33 elfutils-libelf elfutils-libelf-devel \
expat gcc gcc-c++ glibc glibc-common glibc-devel glibc-headers libaio \
libaio-devel libgcc libstdc++ libstdc++-devel make pdksh sysstat unixODBC \
unixODBC-devel | grep "not installed"
package pdksh is not installed发现
pdksh没有安装成功执行
yum -y install pdksh再次安装,发现 CentOS 7 没有相关的安装包shell 1
2
3
4
5
6
7
8yum -y install pdksh
Loaded plugins: fastestmirror, langpacks
Loading mirror speeds from cached hostfile
* base: mirrors.aliyun.com
* extras: mirrors.aliyun.com
* updates: mirrors.aliyun.com
No package pdksh available.
Error: Nothing to do通过
wget命令直接下载pdksh的rpm包shell 1
wget http://vault.centos.org/5.11/os/x86_64/CentOS/pdksh-5.2.14-37.el5_8.1.x86_64.rpm
安装
pdkshshell 1
yum -y install pdksh-5.2.14-37.el5_8.1.x86_64.rpm
再次检查依赖包安装完整性,无提示则通过。
shell 1
rpm -q pdksh | grep "not installed"
添加 oracle 用户及组
创建 oracle 用户组
shell 1
2
3
4groupadd oinstall
groupadd dba
groupadd asmadmin
groupadd asmdba创建 oracle 用户并加入到组
shell 1
useradd -g oinstall -G dba,asmdba oracle -d /home/oracle
添加完成后查看 oracle 用户
shell 1
2id oracle
uid=1000(oracle) gid=1000(oinstall) groups=1000(oinstall),1001(dba),1003(asmdba)初始化 oracle 用户的密码
shell 1
passwd oracle
配置 hostname 及防火墙
关闭 SELinux
1 | setenforce 0 |
开放防火墙端口
1 | firewall-cmd --zone=public --permanent --add-port=1521/tcp |
修改 hostname
1 | hostnamectl set-hostname centos-oracle |
修改完成后退出终端并重新登录
添加本机 IP 映射到 /etc/hosts
1 | echo '192.168.1.96 centos-oracle' >> /etc/hosts |
测试hostname
1 | ping -c 2 centos-oracle |
优化 OS 内核参数
1 | vim /etc/sysctl.conf |
添加内容如下:
1 | =1048576 |
参数详解:
fs.aio-max-nr:
同时可以拥有的的异步IO请求数目。
推荐值是:1048576 其实它等于 $ 1024 \times 1024 = 1048576 $ 也就是 1024K 个。
fs.file-max:
表示一个进程可以打开的文件句柄的最大数量。
kernel.shmall 的单位是页。
简述:2097152 =8G ,4194304=16G
详述:对于 X86 的 linux 系统,一页=4k,也就是4096字节。
kernel.shmall = 2097152就是 $8G \times 1024 \times 1024 \div 4k = 2097152$ 就是说可用共享内存一共 8G。一个共享内存段的最大大小是16G,那么需要共享内存页数是 $16GB \div 4KB = 16777216KB \div 4KB = 4194304$ (页),也就是 64Bit 系统下 16GB 物理内存,设置
kernel.shmall = 4194304才符合要求(几乎是原来设置值 2097152 的两倍)。这时可以将shmmax参数调整到 16G 了,同时可以修改SGA_MAX_SIZE和SGA_TARGET为 12G(您想设置的 SGA 最大大小,当然也可以是 2G~14G 等,还要协调 PGA 参数及 OS 等其他内存使用,不能设置太满,比如16G)。kernel.shmmni:
共享内存段的最大数量,
shmmni缺省值 4096 ,一般肯定是够用了。kernel.shmmax:
该参数可设置为物理内存的一半。
Shmmax是核心参数中最重要的参数之一,用于定义单个共享内存段的最大值(以字节为单位),设置应该足够大,能在一个共享内存段下容纳下整个的 SGA,设置的过低可能会导致需要创建多个共享内存段,这样可能导致系统性能的下降,最大值为 16GB (在大多数情况下,该值应该比 SGA 大)。其值应
>=sag_max_size初始化参数的大小,否则 SAG 由多个内存段构成,效率降低,还要不小于物理内存的一半,默认情况下在 32位x86系统 中,Oracle SGA 最大不能超过 1.7GB。缺省为 32M,对于 Oracle 来说,该缺省值太低了,通常将其设置为2G(2147483648)。针对8G的服务器,至少 4G 的配置,则是4294967296。kernel.sem:
表示设置的信号量
net.ipv4.ip_local_port_range:
专用服务器模式下与用户进程通信时分配给用户的端口区间
net.core.rmem_default:
默认接收缓冲区大小
net.core.rmem_max:
接收缓冲区最大值
net.core.wmem_default:
默认的发送缓冲区大小
net.core.wmem_max:
发送缓冲区最大值
添加并保存后,执行命令使参数生效
1 | sysctl -p |
使用
ipcs -l查看结果shell 1
2
3
4
5
6
7
8
9
10
11
12
13
14
15
16
17
18
19ipcs -l
------ Messages Limits --------
max queues system wide = 15637
max size of message (bytes) = 8192
default max size of queue (bytes) = 16384
------ Shared Memory Limits --------
max number of segments = 4096
max seg size (kbytes) = 4194304
max total shared memory (kbytes) = 8388608
min seg size (bytes) = 1
------ Semaphore Limits --------
max number of arrays = 128
max semaphores per array = 250
max semaphores system wide = 32000
max ops per semop call = 100
semaphore max value = 32767使用
ipcs -u查看实际使用情况shell 1
2
3
4
5
6
7
8
9
10
11
12
13
14
15
16
17ipcs -u
------ Messages Status --------
allocated queues = 0
used headers = 0
used space = 0 bytes
------ Shared Memory Status --------
segments allocated 0
pages allocated 0
pages resident 0
pages swapped 0
Swap performance: 0 attempts 0 successes
------ Semaphore Status --------
used arrays = 0
allocated semaphores = 0
限制 oracle 用户权限
限制 oracle 用户 shell 权限
1 | vim /etc/security/limits.conf |
在末尾添加
1 | oracle soft nproc 2047 |
limits.conf 配置说明:
格式:
1 | <type> <resource> <value> |
domain:
username|@groupname:设置需要被限制的用户名,组名前面加@与用户名区别。*表示所有用户(注意有的系统不支持)。type:
soft指的是当前系统生效的设置值hard表明系统中所能设定的最大值(soft 的限制不能比 hard 限制高 )-就表明同时设置了 soft 和 hard 的值
resource:
针对Oracle的我们主要配置nproc nofile
as:地址空间限制rss:最大持久设置大小cpu:以分钟为单位的最多 CPU 时间core:限制内核文件的大小date:最大数据大小stack:最大栈大小fsize:最大文件大小noproc:进程的最大数目nofile:打开文件的最大数目memlock:最大锁定内存地址空间maxlogins:此用户允许登录的最大数目
value:
限制的值
修改登陆验证配置文件
1 | vim /etc/pam.d/login |
末尾增加
1 | session required /lib64/security/pam_limits.so |
添加 oracle profile 配置文件
1 | vim /etc/profile.d/oracle.sh |
内容如下:
1 | if [ $USER = "oracle" ]; then |
保存后使之生效
1 | source /etc/profile |
创建 oracle 安装目录
1 | mkdir -p /u01/app/oracle/product/11.2.0 # oracle home 目录 |
配置 oracle 用户环境变量
切换至 oracle 用户
1 | su - oracle |
修改 oracle 用户 home 路径下 .bash_profile 配置文件
1 | vim ~/.bash_profile |
在末尾添加
1 | # Oracle |
使配置生效
1 | source /home/oracle/.bash_profile |
使用 env 命令查看环境变量
解压 oracle 压缩文件
切换回 root 用户,解压 oracle 压缩文件至 /u01/ 路径下
1 | unzip linux.x64_11gR2_database_1of2.zip -d /u01/ |
解压完成后
1 | mkdir /u01/etc/ |
修改 db_install.rsp
1 | vim /u01/etc/db_install.rsp |
修改内容如下:
1 | =INSTALL_DB_SWONLY |
保存退出后,开始安装 oracle
安装 oracle
切换至 oracle 用户
1 | su - oracle |
进入解压后的 oracle 安装目录
1 | cd /u01/database/ |
开始执行静默安装
1 | ./runInstaller -silent -ignorePrereq -responseFile /u01/etc/db_install.rsp |
根据提示的日志路径,安装期间可以新开个终端并使用 tail 命令查看 oracle 的安装日志
1 | tail -f /u01/app/oracle/inventory/logs/installActions2020-03-18_10-01-22AM.log |
根据 ./runInstaller 输出提示
新开一个终端并以 root 账号执行脚本
执行
orainstRoot.shshell 1
2
3
4
5
6
7/u01/app/oracle/inventory/orainstRoot.sh
Changing permissions of /u01/app/oracle/inventory.
Adding read,write permissions for group.
Removing read,write,execute permissions for world.
Changing groupname of /u01/app/oracle/inventory to oinstall.
The execution of the script is complete.执行
root.shshell 1
2/u01/app/oracle/product/11.2.0/root.sh
Check /u01/app/oracle/product/11.2.0/install/root_centos-oracle_2020-03-18_10-09-45.log for the output of root script
根据提示再次检查日志
1 | tail -f /u01/app/oracle/product/11.2.0/install/root_centos-oracle_2020-03-17_17-18-23.log |
配置静默监听
切换到 oracle 用户
1 | su - oracle |
配置监听
1 | netca /silent /responsefile /u01/etc/netca.rsp |
查看监听端口
1 | netstat -tnulp | grep 1521 |
监听启动与关闭命令
- 启动:
lsnrctl start - 状态:
lsnrctl status - 关闭:
lsnrctl stop
静默创建数据库
1 | vim /u01/etc/dbca.rsp |
修改内容如下
1 | GDBNAME = "orcl" |
其中 TOTALMEMORY 设置为总内存的 80%,即8G内存的80%
$8G \times 1024 \times 0.8 \approx 6553MB$
保存退出后,执行静默创建数据库
1 | dbca -silent -responseFile /u01/etc/dbca.rsp |
查看 oracle 实例进程
1 | ps -ef | grep ora_ | grep -v grep |
查看监听状态
1 | lsnrctl status |
登录 sqlplus,查看实例状态
注意:如果数据库 service_name 或者 SID 名不为默认的 ORCL,想要通过 sqlplus 无密码登陆需要在命令行中设置环境变量 export ORACLE_SID=ORCL1,把其中 ORCL1替换为你的SID。
如果查询报错,参考:ORA-01034
1 | sqlplus / as sysdba |
查看数据库编码
1 | select userenv('language') from dual; |
查看数据库版本信息
1 | select * from v$version; |
激活 scott 用户
1 | alter user scott account unlock; |
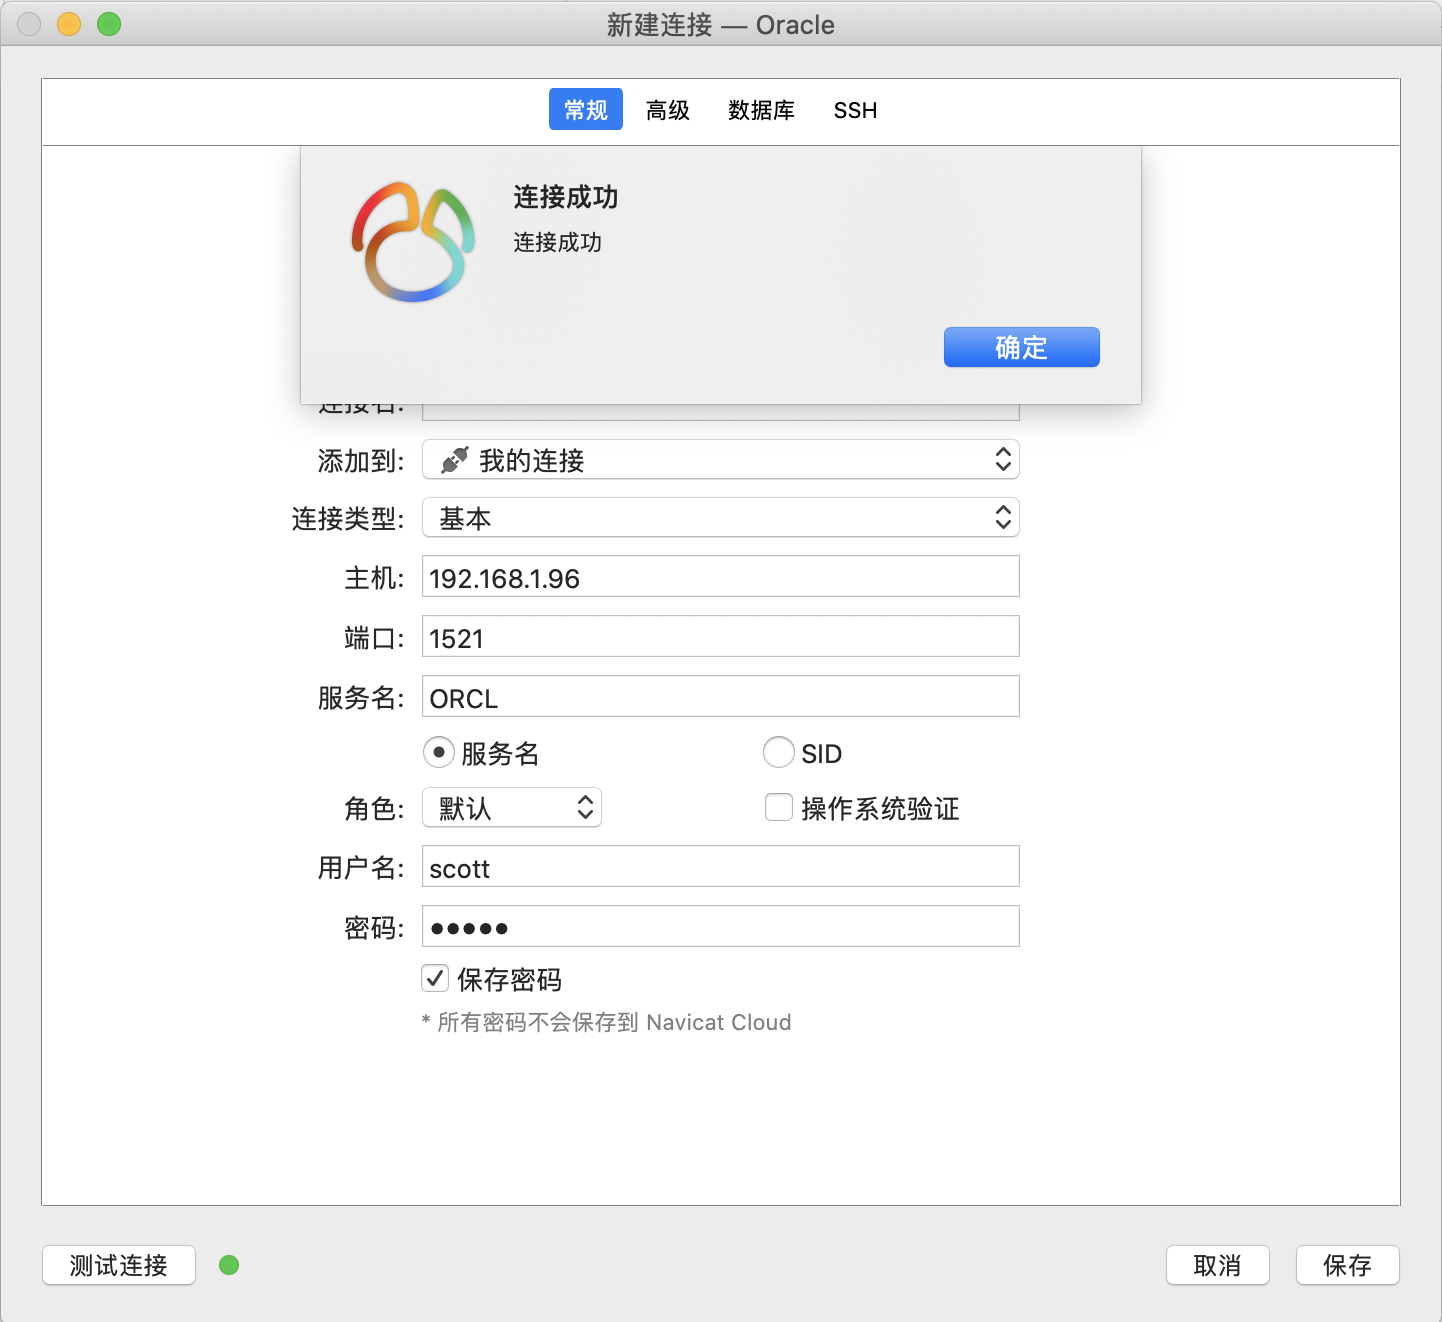
远程连接 Oracle
以 Navicat 为例,推荐使用PL/SQL
使用刚激活的账号:scott 密码:tiger
以 OS X 上 Navicat 连接为例。Windows 下 Navicat 连接 Oracle 需要手动配置 oci.dll
远程使用 sysdba 账号
如需远程使用 sysdba 权限组账号登录。需进行如下操作:
查看当前环境变量中
ORACLE_SIDshell 1
2echo $ORACLE_SID
ORCL替换 SID 为当前需要修改数据库
shell 1
export ORACLE_SID=akiya
连接数据库
shell 1
sqlplus / as sysdba
查看当前数据库,确认是否正确
shell 1
2
3
4
5select name from v$database;
NAME
------------------
AKIYA检查远程登录设置
shell 1
2
3
4
5
6
7
8show parameter pass;
NAME TYPE
------------------------------------ ----------------------
VALUE
------------------------------
remote_login_passwordfile string
NONE修改配置,使 sysdba 用户(及拥有其角色的普通用户)可以远程登录。
shell 1
2
3alter system set remote_login_passwordfile=exclusive scope=spfile;
System altered.重启数据库
shell 1
2
3
4
5
6
7
8
9
10startup force;
ORACLE instance started.
Total System Global Area 1603411968 bytes
Fixed Size 2213776 bytes
Variable Size 402655344 bytes
Database Buffers 1191182336 bytes
Redo Buffers 7360512 bytes
Database mounted.
Database opened.重置用户密码
shell 1
alter user <username> identified by <new_password>;
现在可以使用
sysdba权限账号例如system账号,密码<new_password>远程登录了
创建用户并赋权 sysdba 角色
连接数据库
shell 1
sqlplus / as sysdba
创建用户
akiya并设置密码为akiya_pwdshell 1
2
3create user akiya identified by akiya_pwd;
User created.为用户
akiya添加角色sysdbashell 1
2
3grant sysdba to jayx;
Grant succeeded.
错误处理
ORA-01034
问题描述:
使用 sqlplus 登陆后执行 SQL 报错。
1 | sqlplus / as sysdba |
解决方法:
关闭数据库实例并重启
1 | shutdown immedate |
如果报错参考:ORA-01078
ORA-01078
ORA-01078: failure in processing system parameters
问题描述:
启动数据库实例报错。
1 | startup; |
错误原因:
在 oracle9i、10g、11g 等几个版本中,数据库默认使用 spfile 启动数据库,如果 spfile 不存在,则就会出现上述错误。
解决方法:
用 find /u01/ -name pfile 命令查找 pfile 文件的位置
1 | find /u01/ -name pfile |
进入查找到的文件夹
1 | cd /u01/app/oracle/admin/orcl/pfile |
将 $ORACLE_BASE/admin/orcl11g/pfile 目录下的 init.ora.2182020102439 拷贝到 $ORACLE_HOME/dbs 目录下,并命名为 initORCL.ora 即可。
注意:initORCL.ora 中的 initORCL 为你创建的实例名 ORACLE_SID,同 静默创建数据库 中配置一致
1 | cp /u01/app/oracle/admin/orcl/pfile/init.ora.2182020102439 $ORACLE_HOME/dbs/initORCL.ora |
再次登陆 sqlplus
1 | sqlplus / as sysdba |
ORA-01102
ORA-01102: cannot mount database in EXCLUSIVE mode
问题描述:
由于文件被占用,无法锁定导致数据库无法挂载。
1 | startup; |
解决方法:
进入数据库关闭实例
1 | sqlplus / as sysdba |
进入 $ORACLE_HOME/dbs,找到名为 lk* 的文件,正常情况下是没有这个文件的
1 | cd $ORACLE_HOME/dbs |
切换到 root 用户
1 | fuser -u /u01/app/oracle/product/11.2.0/dbs/lkORCL |
如果出现 fuser: command not found,则执行命令安装 yum -y install psmisc
1 | fuser -u /u01/app/oracle/product/11.2.0/dbs/lkORCL |
重新启动数据库看看,这个时候数据库没有报错了,能正常起来。
1 | sqlplus / as sysdba |
ORA-12514
ORA-12514: TNS:listener does not currently know of service requested in connect descriptor
重启数据库即可
- 关闭数据库
shell 1
2sqlplus / as sysdba
shutdown immediate - 重启监听程序
重启前后可以对比下 pid 是否一致重启shell 1
ps -ef | grep ora_ | grep -v grep
查看监听状态shell 1
2lsnrctl stop
lsnrctl startshell 1
lsnrctl status
- 启动数据库 如果还是连接报错,请查看
shell 1
2sqlplus / as sysdba
startuplsnrctl status中日志文件排查错误。
ORA-28000
ORA-28000: the account is locked
解决方法:
在服务上通过 sqlplus / as sysdba 登陆 Oracle,然后是解锁该账户
1 | sqlplus / as sysdba |
ORA-01994
ORA-01994: GRANT failed: password file missing or disabled
给新加的用户分配 sysdba 权限时出现错误提示
查看当前数据库名
shell 1
2
3
4
5select name from v$database;
NAME
------------------
ORCL注意:返回的 NAME 是
ORCL而不是orcl,后面我们会用到这个 NAME查看密码文件是否存在
shell 1
2ho ls $ORACLE_HOME/dbs/orapw*
/u01/app/oracle/product/11.2.0//dbs/orapworcl根据返回值我们可以看到
orapw*的文件只有一个名为orapworcl的,但是我们的数据库名为ORCL。所以我们需要创建一个数据库同名的密码文件创建数据库
ORCL密码文件shell 1
ho orapwd file=$ORACLE_HOME/dbs/orapwORCL password=oracle entries=10;
重新分配权限
shell 1
2
3grant sysdba to akiya;
Grant succeeded.
- 本文标题:CentOS7 静默安装 Oracle 11g
- 本文作者:akiya
- 本文链接:https://little-star.love/posts/2b719439/
- 版权声明:本博客所有文章除特别声明外,均采用 CC BY-NC-SA 4.0 许可协议。转载请注明出处!