
使用 clash 搭建透明网关实现旁路科学上网自由
基于 Ubuntu 20.04.3 LTS 搭建 Clash 服务实现旁路网关功能,为局域网设备提供科学上网
前言
不知怎么的 LEDE 软路由 上的 ss 与 v2ray 突然不能访问外网了(科学上网失败😭),与朋友沟通后发现不止我一个人这样(估计是机场的问题吧),索性就折腾一番,把之前搭建的旁路 LEDE 软路由给去掉,换成 clash 做旁路网关吧
安装 clash
下载 clash
shell 1
wget https://github.com/Dreamacro/clash/releases/download/v1.8.0/clash-linux-amd64-v1.8.0.gz
解压并安装 clash 二进制文件
shell 1
2gzip -d clash-linux-amd64-v1.8.0.gz
install clash-linux-amd64-v1.8.0 /usr/local/bin/clash创建 clash 的
systemd配置文件/etc/systemd/system/clash.service 1
2
3
4
5
6
7
8
9
10
11[Unit]
Description=Clash daemon, A rule-based proxy in Go.
After=network.target
[Service]
Type=simple
Restart=always
ExecStart=/usr/local/bin/clash -d /etc/clash
[Install]
WantedBy=multi-user.target设置
clash为开机自动启,并启动该服务shell 1
2systemctl enable clash
systemctl start clash查看
clash服务状态shell 1
systemctl status clash
导入 clash web 管理界面
shell 1
git clone -b gh-pages --depth 1 https://github.com/Dreamacro/clash-dashboard /opt/clash-dashboard
流量转发
开启 Linux 内核的转发功能
注意:如果不开启该功能则可能存在内网设备无法访问问题
编辑配置文件
/etc/sysctl.conf并向其中添加如下内容/etc/sysctl.conf 1
=1
保存退出后,执行以下命令使修改生效
shell 1
sysctl -p
查看
/proc/sys/net/ipv4/ip_forward的内容,如果是1表示设置成功生效
nftables
使用 nftables 替代 iptables 做流量转发,如果不想用 nftables 也可以使用添加如下 iptables 规则
1 | iptables -t nat -N clash |
安装 nftables
shell 1
apt -y install nftables
创建 nftables 配置文件扩展目录
shell 1
mkdir /etc/nftables.conf.d
创建私有地址的定义文件
/etc/nftables.conf.d/private.nft 1
2
3
4
5
6
7
8
9
10define private_list = {
0.0.0.0/8,
10.0.0.0/8,
127.0.0.0/8,
169.254.0.0/16,
172.16.0.0/12,
192.168.0.0/16,
224.0.0.0/4,
240.0.0.0/4
}修改 nftalbes 配置文件,内容如下
/etc/nftables.conf 1
2
3
4
5
6
7
8
9
10
11
12
13
14#!/usr/sbin/nft -f
include "/etc/nftables.conf.d/private.nft"
table ip nat {
chain proxy {
ip daddr $private_list return
ip protocol tcp redirect to :7892
}
chain prerouting {
type nat hook prerouting priority 0; policy accept;
jump proxy
}
}清空 nftalbes 规则,并使新规则生效
shell 1
2nft flush ruleset
nft -f /etc/nftables.conf查看 nftalbes 当前规则
shell 1
nft list ruleset
设置
nftalbes开机自启动shell 1
systemctl enable nftables
配置机场订阅
订阅脚本
安装
Ruby,选用Ruby是为了更简单的解析yaml格式文件,如果选用Python则还需要安装 PyYAML 库才能使用,而Ruby则可以直接解析该格式文件shell 1
apt -y install ruby
创建订阅脚本与配置文件存放目录
shell 1
mkdir /etc/subladder
创建
clash基础信息配置文件,并写入如下内容注意:
nameserver与fallback设置为如此是为解决 DNS 污染问题(参考:DNS污染对Clash(for-Windows)的影响之dns污染会怎样)本人不幸中招过,设置
nameserver为ipv4的 DNS 服务器,例如114.114.114.114时,作为透明网关访问 google.com 时被劫持到轮子网站上了(# ̄~ ̄#),妈的轮子死全家
/etc/subladder/config.yaml 1
2
3
4
5
6
7
8
9
10
11
12
13
14
15
16
17
18
19
20
21
22
23
24
25
26
27
28
29
30
31
32
33
34
35
36
37
38
39
40
41
42
43
44
45
46
47
48
49
50
51
52
53
54
55
56# HTTP 代理端口
port: 7890
# SOCKS5 代理端口
socks-port: 7891
# Linux 和 macOS 的 redir 代理端口
redir-port: 7892
# 允许局域网的连接
allow-lan: true
# 规则模式:Rule(规则) rules/ Global(全局代理)/ Direct(全局直连)
mode: rule
# 设置日志输出级别 (默认级别:silent,即不输出任何内容,以避免因日志内容过大而导致程序内存溢出)。
# 5 个级别:silent / info / warning / error / debug。级别越高日志输出量越大,越倾向于调试,若需要请自行开启。
log-level: silent
# Clash 的 RESTful API
external-controller: '0.0.0.0:9090'
# RESTful API 的口令
secret: ''
# 您可以将静态网页资源(如 clash-dashboard)放置在一个目录中,clash 将会服务于 `RESTful API/ui`
# 参数应填写配置目录的相对路径或绝对路径。
external-ui: /opt/clash-dashboard
dns:
enable: true
ipv6: false
# DNS 绑定在 5352/udp 端口上,提供给 unbound 使用
listen: 0.0.0.0:5352
enhanced-mode: redir-host
default-nameserver:
- 119.29.29.29
- 223.5.5.5
nameserver:
- 'https://doh.pub/dns-query'
- 'https://dns.alidns.com/dns-query'
- 'tls://dns.rubyfish.cn:853'
fallback:
- 'https://dns.google/dns-query'
- 'https://1.1.1.1/dns-query'
- 'tls://1.1.1.1:853'
- 'tcp://1.1.1.1:53'
- 'tcp://208.67.222.222:443'
- 'tls://dns.google'
fallback-filter:
geoip: true
ipcidr:
- 240.0.0.0/4
- 127.0.0.1/8
- 0.0.0.0/32
domain:
- +.google.com
- +.facebook.com
- +.twitter.com
- +.youtube.com
- +.xn--ngstr-lra8j.com
- +.google.cn
- +.googleapis.cn
- +.googleapis.com
- +.gvt1.com创建
Ruby脚本,用于合并clash基础信息配置文件与机场订阅配置文件,机场配置文件仅适用于 自由鲸,如使用其他机场请自行修改脚本内容/etc/subladder/subladder.rb 1
2
3
4
5
6
7
8
9
10
11
12
13
14
15
16
17
18
19
20
21
22
23
24
25
26
27
28
29
30
31
32
33
34
35#!/usr/bin/env ruby
# -*- coding: UTF-8 -*-
require 'yaml'
raw = YAML.load_file(ENV['CLASH_SOURCE_REMOTE'] || 'remote.yaml')
config = YAML.load_file(ENV['CLASH_SOURCE_CONFIG'] || 'config.yaml')
update_whitelist = [
"proxies",
"proxy-groups",
"rules"
]
update_whitelist.each do |white|
config[white] = raw[white]
end
config['proxies'].each do |proxie|
if proxie['name'].include?'Tip' then
config['proxies'].delete(proxie)
end
end
config['proxy-groups'].each do |item|
if item['name'] == 'Proxy' then
item['proxies'].each do |proxie|
if proxie.include?'Tip' then
item['proxies'].delete(proxie)
end
end
end
end
File.open(ENV['CLASH_RESULT_CONFIG'] || 'result.yaml', 'w') { |f| f.write config.to_yaml }为脚本
subladder.rb创建配置文件/etc/subladder/subladder.conf 1
2
3
4
5
6
7
8# 订阅地址
ADDRESS="https://api.qiduo.eu.org/link/<你的私有key>"
# 订阅的源文件缓存的文件名。被更新的字段来源的文件
CLASH_SOURCE_REMOTE="remote.yaml"
# clash 实际加载的配置文件。(以这个文件为基本配置文件,去更新关键的字段)
CLASH_SOURCE_CONFIG="config.yaml"
# 处理后的文件,更新了关键字段的结果文件
CLASH_RESULT_CONFIG="/etc/clash/config.yaml"创建名为
subladder.service的 systemd 脚本/etc/systemd/system/subladder.service 1
2
3
4
5
6
7
8
9
10
11
12
13
14[Unit]
Description=Subscription Remote Configuration
After=network.target
[Service]
Type=oneshot
WorkingDirectory=/etc/subladder
EnvironmentFile=/etc/subladder/subladder.conf
ExecStartPre=/usr/bin/wget -O ${CLASH_SOURCE_REMOTE} ${ADDRESS}
ExecStart=/usr/bin/ruby subladder.rb
ExecStartPost=/bin/sh -c "systemctl restart clash.service"
[Install]
WantedBy=multi-user.target为
subladder.service创建定时任务脚本subladder.timer/etc/systemd/system/subladder.timer 1
2
3
4
5
6
7
8
9
10[Unit]
Description=Run Subladder Daily
[Timer]
#OnCalendar=daily
OnCalendar=*-*-* 04:00:00
RandomizedDelaySec=60m
[Install]
WantedBy=timers.target启用定时器
subladder.timershell 1
systemctl enable subladder.timer
查看定时器
shell 1
systemctl list-timers
测试代理
运行一次
subladder.serviceshell 1
systemctl start subladder
检查
/etc/clash/config.yaml是否已生成检查
clash服务是否运行shell 1
systemctl status clash
访问 clash web ui,http://ubuntu-server-ip:9090/ui
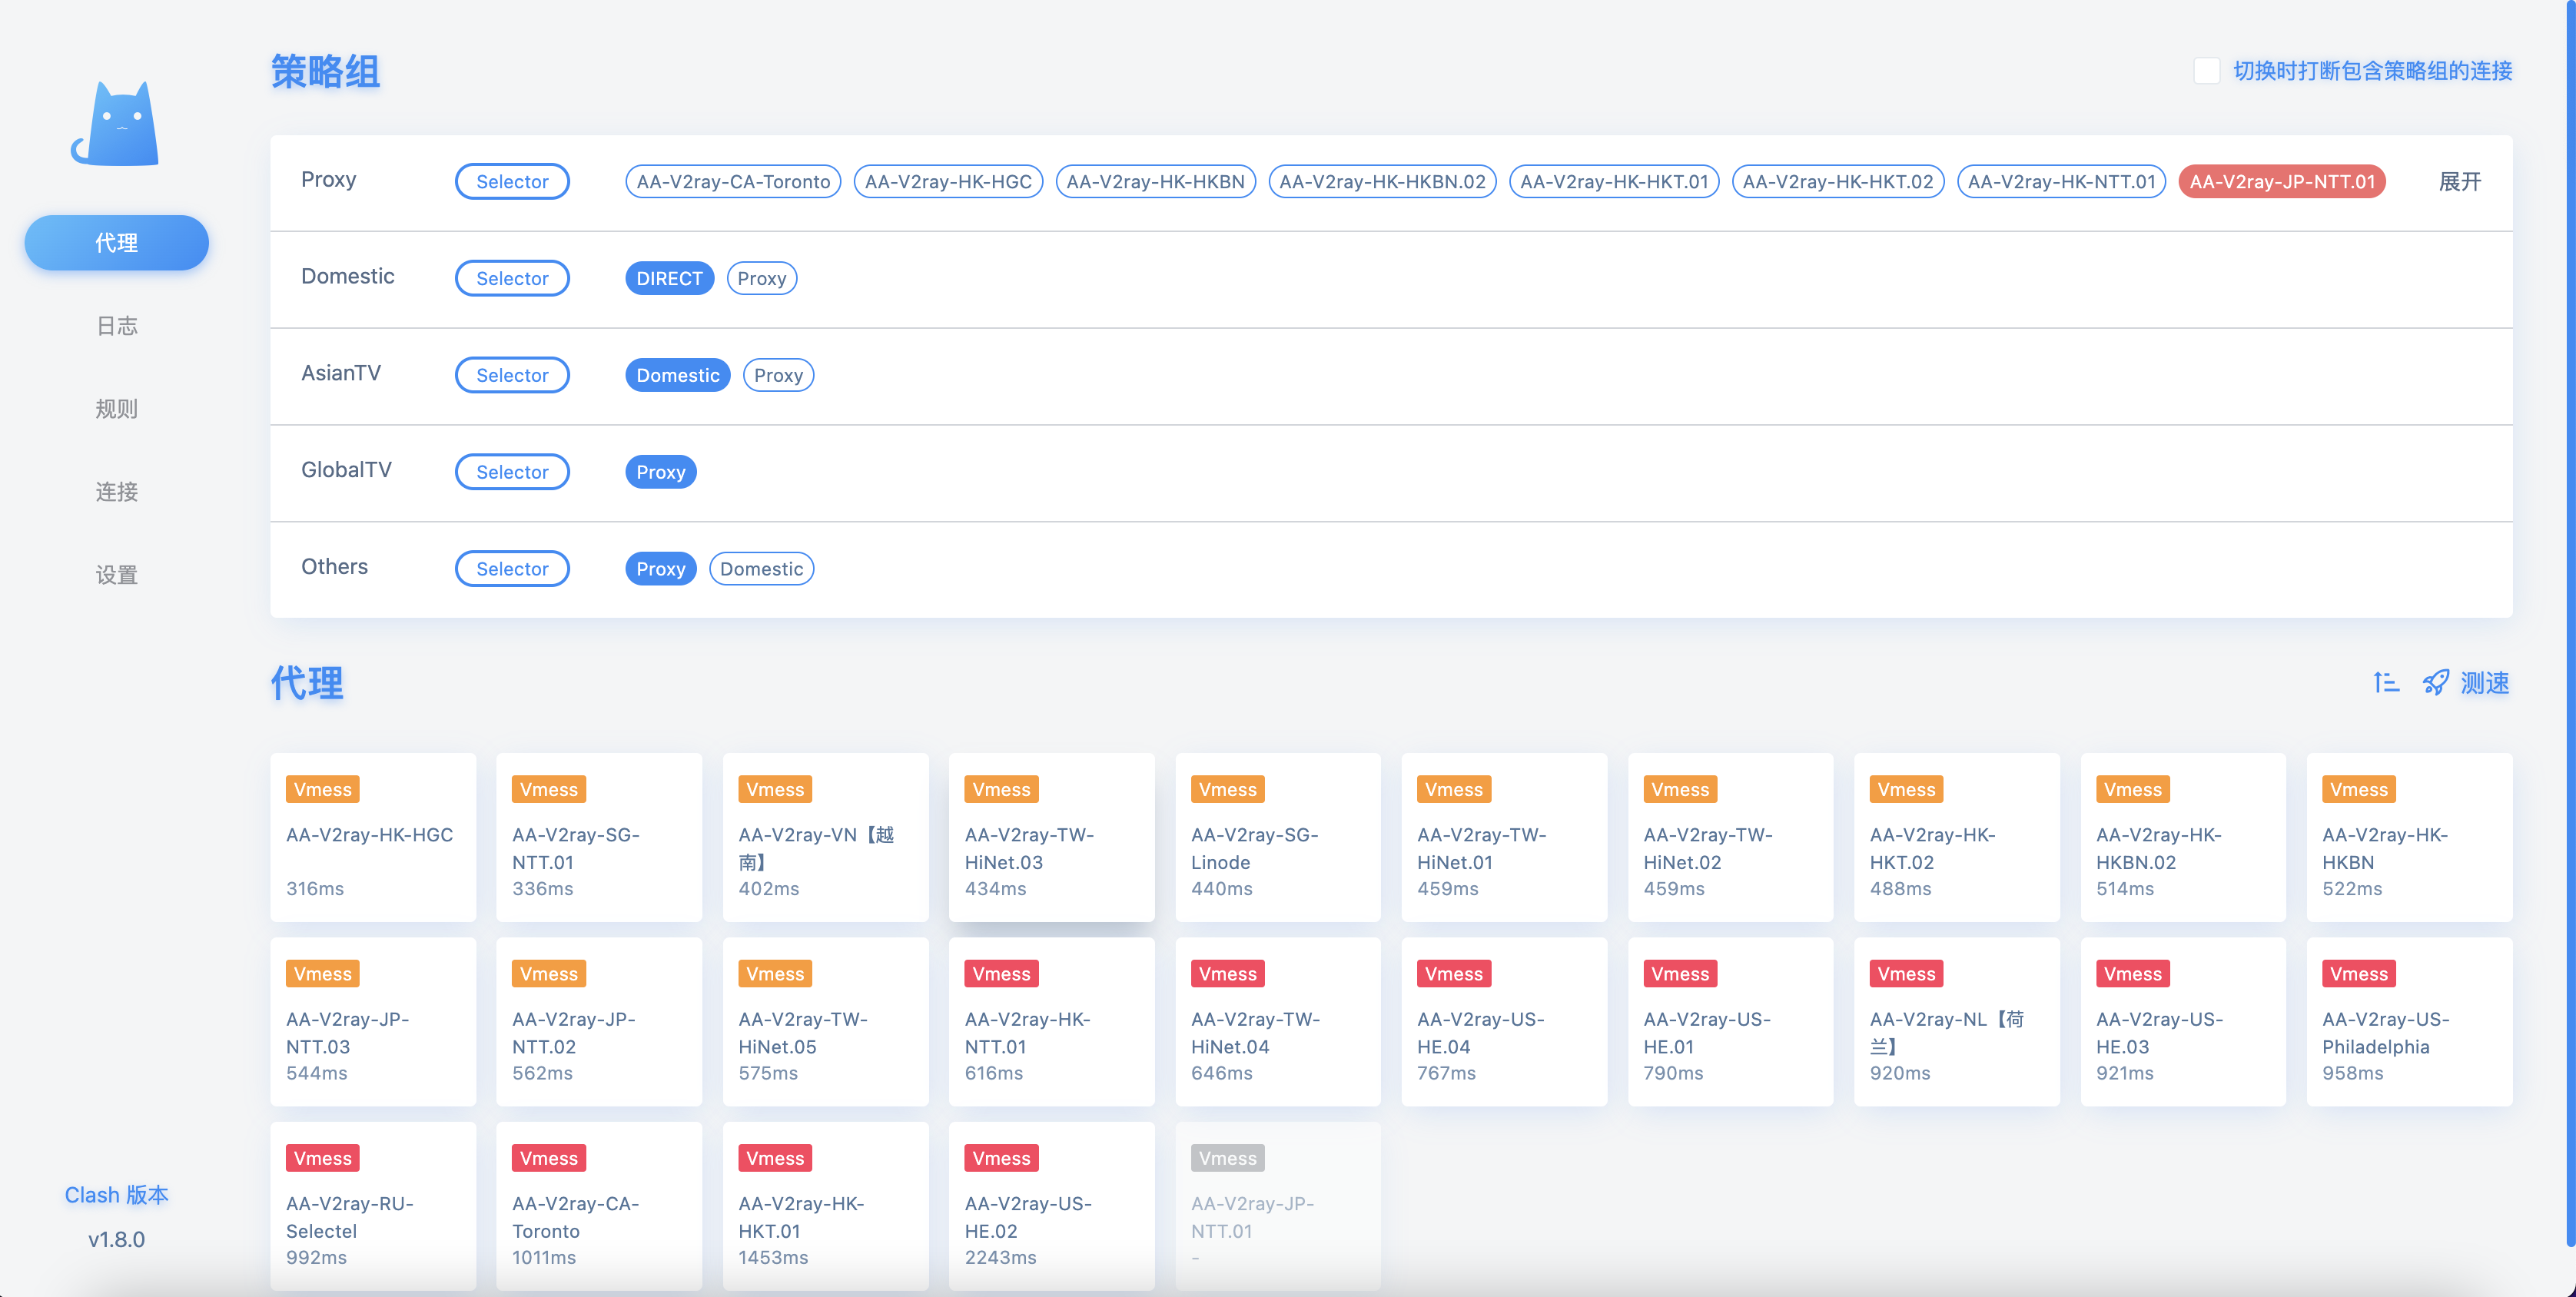
测试
http_proxyshell 1
2
3
4
5
6
7
8
9
10export http_proxy="127.0.0.1:7890"
export https_proxy="127.0.0.1:7890"
export no_proxy="localhost, 127.0.0.1, 192.168.1.0/24, 10.0.0.0/8"
curl google.com
<HTML><HEAD><meta http-equiv="content-type" content="text/html;charset=utf-8">
<TITLE>301 Moved</TITLE></HEAD><BODY>
<H1>301 Moved</H1>
The document has moved
<A HREF="http://www.google.com/">here</A>.
</BODY></HTML>
配置 DNS
通过 SmartDNS 查询国内 DNS 信息
通过 Clash 查询国外 DNS 信息
使用 dnsmasq-china-list 规则分流国内外流量
使用
unbound提供整合后的 DNS 服务
释放 udp 53 端口
检查 53 端口是否占用
Ubuntu 上
53/udp端口有可能被systemd-resolve服务占用shell 1
2
3
4lsof -i :53
COMMAND PID USER FD TYPE DEVICE SIZE/OFF NODE NAME
systemd-r 650 systemd-resolve 12u IPv4 24448 0t0 UDP 127.0.0.53:domain
systemd-r 650 systemd-resolve 13u IPv4 24449 0t0 TCP 127.0.0.53:domain (LISTEN)编辑
/etc/systemd/resolved.conf文件,取消DNS与DNSStubListener的注释,并做如下改动/etc/systemd/resolved.conf 1
2
3[Resolve]
DNS=223.5.5.5
DNSStubListener=no为
/etc/resolv.conf创建软连接shell 1
ln -sf /run/systemd/resolve/resolv.conf /etc/resolv.conf
重启
systemd-resolved服务shell 1
systemctl restart systemd-resolved
再次查看端口占用
shell 1
lsof -i :53
SmartDNS
下载 SmartDNS
shell 1
wget https://github.com/pymumu/smartdns/releases/download/Release35/smartdns.1.2021.08.27-1923.x86_64-linux-all.tar.gz
解压压缩包
shell 1
tar -zxf smartdns.1.2021.08.27-1923.x86_64-linux-all.tar.gz
安装
SmartDNSshell 1
2cd smartdns/
./install -i修改
SmartDNS配置文件中如下内容可从 https://dns.iui.im/ 查询国内公共 DNS 服务器 IP 地址
/etc/smartdns/smartdns.conf 1
2
3
4
5
6
7
8
9
10
11
12# 修改 dns 监听地址
bind [::]:5351
# 添加上游 dns 服务器
server 223.5.5.5
server 223.6.6.6
server 8.8.8.8
server 119.29.29.29
server 182.254.116.116
server 114.114.114.119
server 114.114.114.114
# 如果需要内网自定义解析域名则按如下格式
address /git.akiya.cc/192.168.1.241设置
SmartDNS为开机自启动,并重启该服务shell 1
2systemctl enable smartdns
systemctl restart smartdns
Unbound
安装
unboundshell 1
apt -y install unbound
创建
/etc/default/unbound配置文件,并写入如下内容/etc/default/unbound 1
2
3# 这个默认会修改 /etc/resolv.conf 文件,设成 false 禁用掉
RESOLVCONF="false"
ROOT_TRUST_ANCHOR_UPDATE="false"修改
unbound配置文件/etc/unbound/unbound.conf 1
2
3
4
5
6
7
8
9
10
11
12
13
14server:
verbosity: 1
num-threads: 2
interface: 0.0.0.0@53
do-ip4: yes
do-udp: yes
do-tcp: no
# 关掉上游 dns 才能使用本地 dns 服务
do-not-query-localhost: no
access-control: 0.0.0.0/0 allow
include: "/etc/unbound/unbound.conf.d/*.conf"
forward-zone:
name: "."
forward-addr: 127.0.0.1@5352添加
unbound到开机自动启shell 1
systemctl enable unbound
dnsmasq-china-list
克隆 dnsmasq-china-list 项目
shell 1
git clone https://github.com/felixonmars/dnsmasq-china-list.git --depth 1
安装
make工具shell 1
apt -y install make
创建
unbound配置文件shell 1
2cd dnsmasq-china-list
make SERVER=127.0.0.1@5351 unbound删除
/etc/unbound/unbound.conf.d/下默认配置文件后拷贝 dnsmasq-china-list 下创建的 unbound 配置文件该目录下shell 1
2rm -f /etc/unbound/unbound.conf.d/*
cp *unbound.conf /etc/unbound/unbound.conf.d/重启 unbound 服务
shell 1
systemctl restart unbound
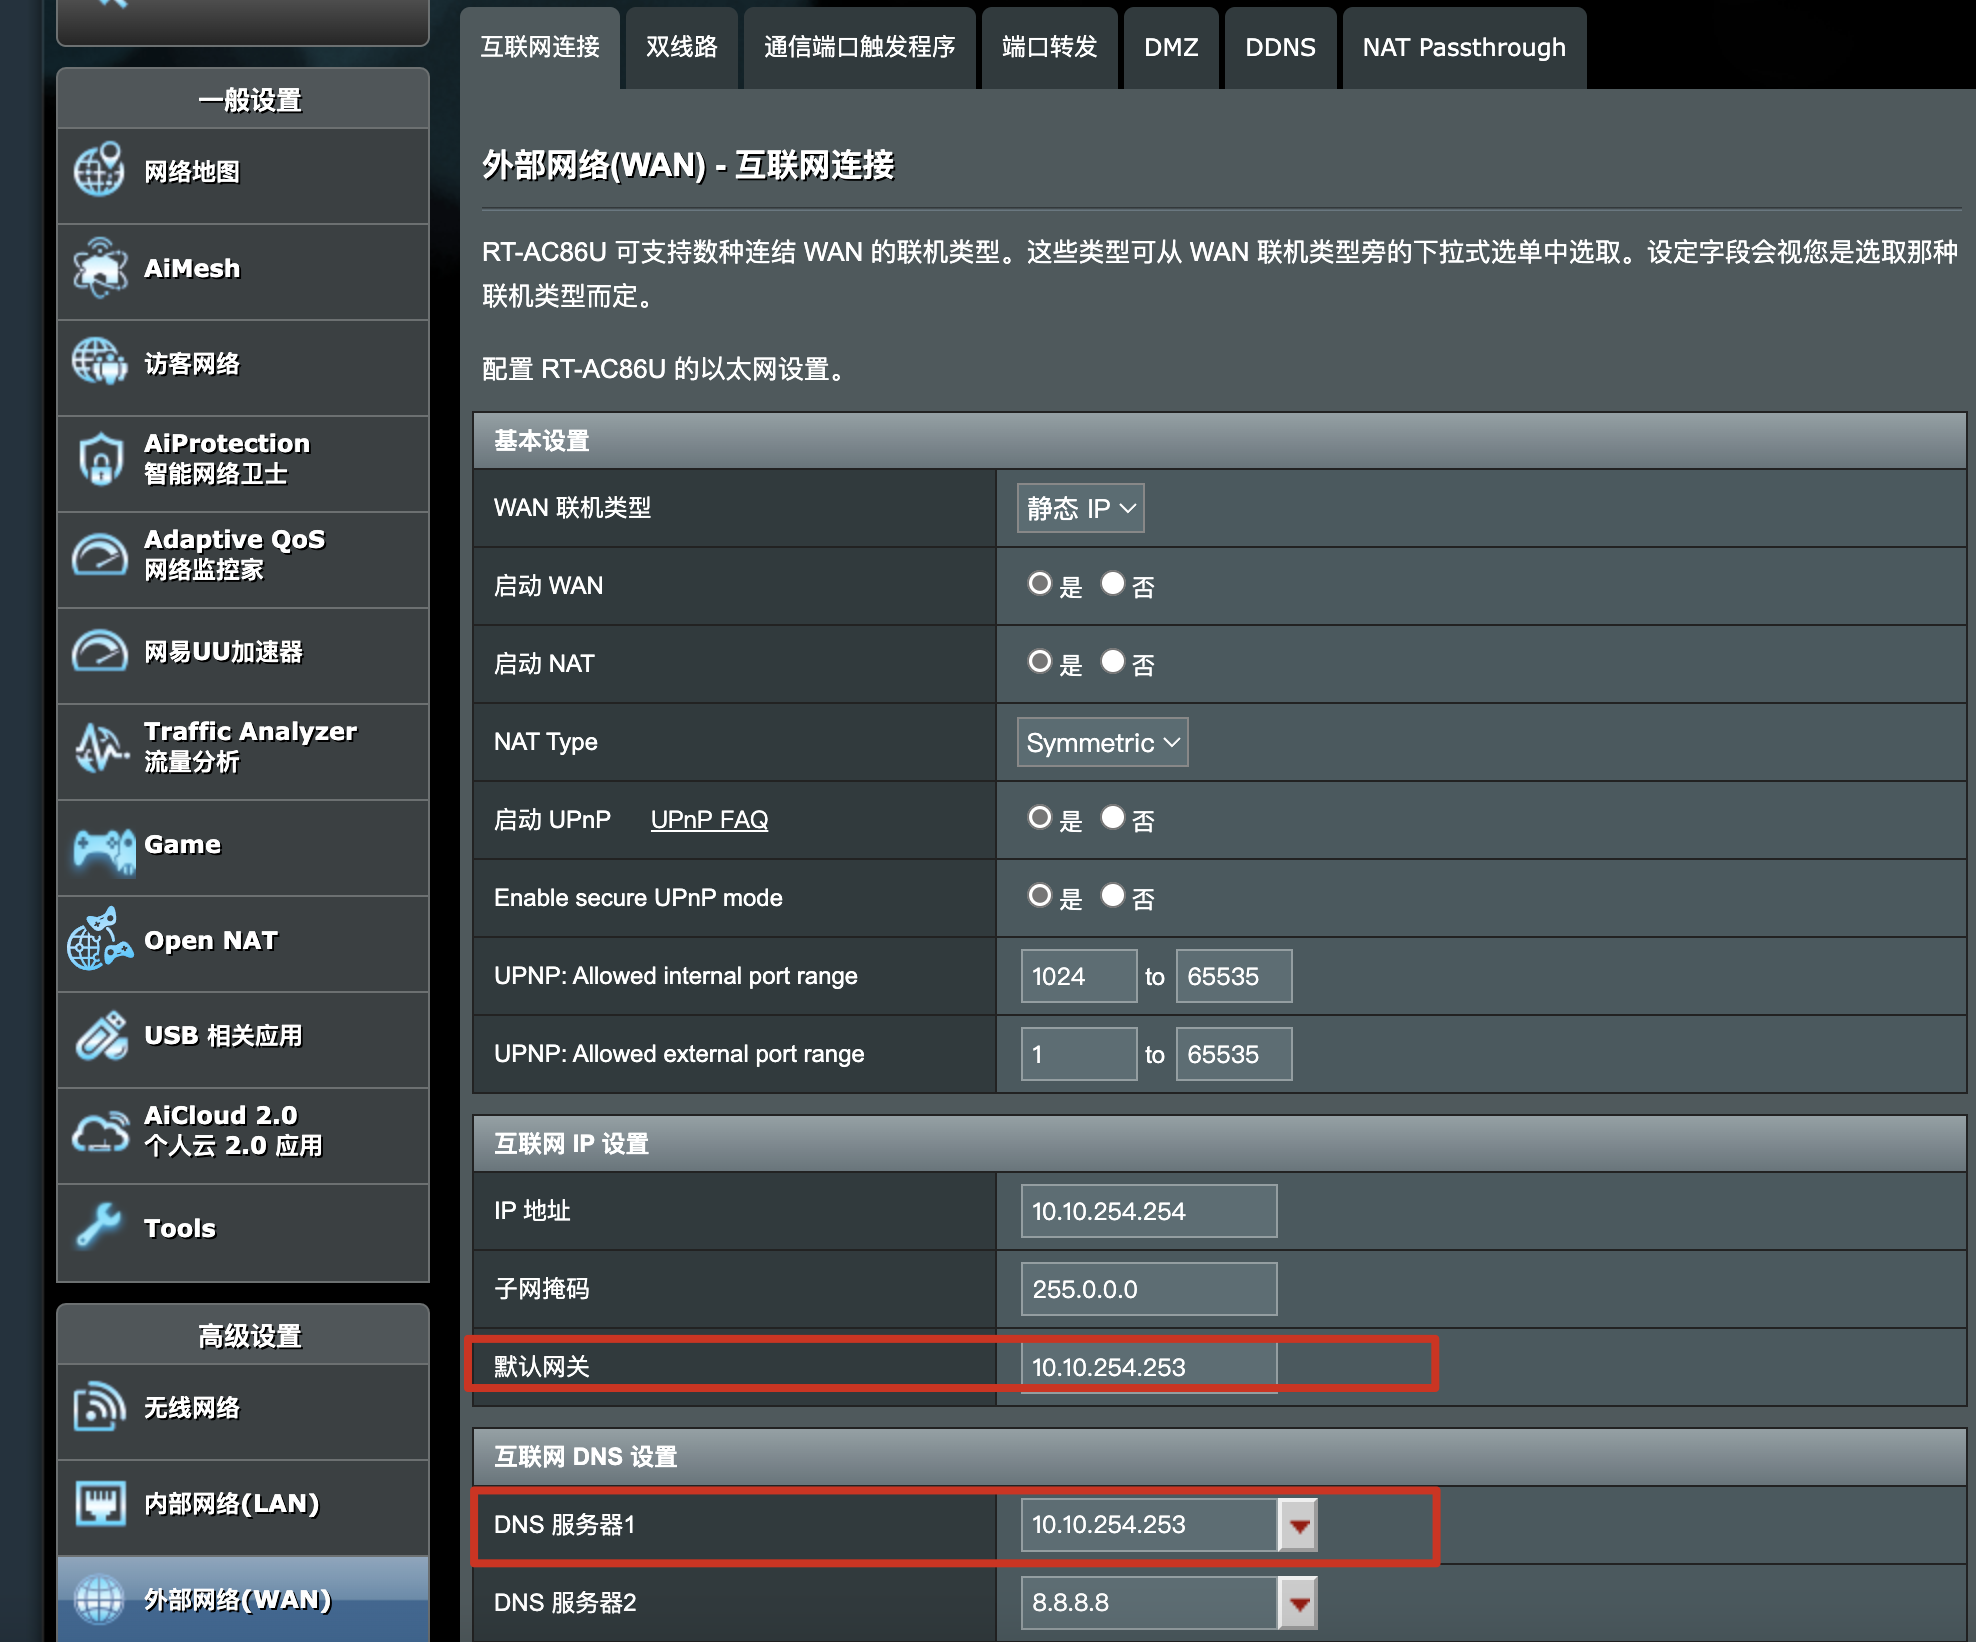
使用透明网关
在路由器中把网关与 DNS 地址指向 Clash 服务器即可
- 网络拓扑
1 | +----------------------+ |
路由器配置
浏览器访问

本地 dns 查询
shell 1
2
3
4
5
6
7
8
9
10
11
12
13
14
15
16
17
18
19
20dig google.com
; <<>> DiG 9.10.6 <<>> google.com
;; global options: +cmd
;; Got answer:
;; ->>HEADER<<- opcode: QUERY, status: NOERROR, id: 22017
;; flags: qr rd ra; QUERY: 1, ANSWER: 1, AUTHORITY: 0, ADDITIONAL: 1
;; OPT PSEUDOSECTION:
; EDNS: version: 0, flags:; udp: 1280
;; QUESTION SECTION:
;google.com. IN A
;; ANSWER SECTION:
google.com. 1 IN A 172.217.160.110
;; Query time: 2 msec
;; SERVER: 172.25.123.254#53(172.25.123.254)
;; WHEN: Wed Feb 23 15:36:25 CST 2022
;; MSG SIZE rcvd: 55
参考文章:
- 本文标题:使用 clash 搭建透明网关实现旁路科学上网自由
- 本文作者:akiya
- 本文链接:https://little-star.love/posts/5d083060/
- 版权声明:本博客所有文章除特别声明外,均采用 CC BY-NC-SA 4.0 许可协议。转载请注明出处!